Olympus IX-81 Chassis Commands
The Olympus IX-81 is a fully automated microscope. If you are buying one, you should get it with the ZDC hardware autofocus system. It, or Nikon’s Perfect Focus system, or an equivalent piece of equipment, should be standard on all microscopes with motorized objective position. The core of the microscope is the chassis, which includes the entire optical path, plus the transmitted light source. Olympus refuses to release the specifications to communicate with the microscope chassis without a non-disclosure agreement. This is deeply unethical, but I have reverse engineered most of the command set to atone for their sin.
Things to keep in mind:
- When talking about the z-axis of a microscope, use “near” and “far” instead of “up” and “down.” “Nearer” always means the objective ends closer to the sample; “farther” means the objective ends farther away. On an inverted microscope, “near” is up and “far” is down; on an upright microscope it is exactly the reverse. Better to use “near” and “far” to avoid confusion.
- You can always get the current state of the system by sending the
command you would use to change that state followed by
?. For example, to get the current objective position, send1OB?. The microscope returns1OB 3, say, if the current objective is position 3 on the nosepiece. - The microscope only understands positive integers, no negative numbers, no floating point. All distances are sent as positive integers measured in hundredths of a micron. All voltages are sent as tenths of a volt. Where negative numbers are needed, such as to specify relative motion, an extra argument is used to tell the microscope the sign of the number.
Communicating with the microscope
The IX-81 chassis is connected to a computer by an RS-232 serial cable. You need the right settings for the RS-232 communication, as reported by PortMon, are
Rate: 19200
StopBits: ERROR Parity: EVEN WordLength: 8
EOF:0 ERR:0 BRK:0 EVT:0 XON:0 XOFF:0
Shake:1 Replace:40 XonLimit:1 XoffLimit:1
RI:10 RM:1 RC:10 WM:100 WC:500
Mask: RXCHAR CTS
All commands are ASCII text terminated by CR LF (0x0d 0x0a, the DOS
newline). The microscope responds in the same way. A command consists of
a command name followed by a space then a series of comma separated
arguments containing no spaces, or a command name followed directly by a
question mark (?) to query the current state of what that
command would change. For example, 1LMPSW ON turns on the
transmitted light lamp, 2MOV N,50,1,300000,49 issues a
command to move the objective along the z-axis, and 1LMPSW?
asks for the current state of the transmitted light lamp.
When you query the state, the microscope returns the command,
followed by a space, followed by the state. So 1LMPSW?
returns 1LMPSW ON if the lamp is on or
1LMPSW OFF if it is off.
When you issue a command to change the state, the microscope returns
the command, followed by a space, followed by a plus sign
(+). So 1LMPSW ON returns
1LMPSW + if it succeeds. If a command fails, the microscope
responds with an X in place of the +.
You can continue to issue commands even while a current command is
processing. You know a command is complete when you receive the response
with that command’s name and + or X.
The microscope ignores all lines of text it receives that don’t begin
with 1 or 2. Invalid commands that do start with 1 or 2 produce
1x and 2x as a response, respectively. For
example,
1rubbish -> 1x
2rubbish -> 2x
Configuring the hardware
You can always use commands to get the state of the microscope, but if you want to change the state, you have to log in:
1LOG IN
2LOG IN
When you log in, it blocks the controls on the microscope unless you
explicitly reenable them. This is why there are two separate commands.
1LOG enables all commands beginning with 1, which control
selecting condensors and objectives, turning lamps on and off, and
opening and closing shutters. 2LOG controls z-motion and
autofocus. Having them separate means you can use the microscope’s focus
wheel as if it were a manual scope, while still controlling the choice
of objective from the computer.
To reenable the focus wheel on the microscope after
2LOG IN, use
2JOG ON
2JOGSNS 10
2joglmt ON
2JOG enables or disables the wheel. 2JOGSNS
sets its sensitivity, and 2joglmt stops the wheel motion
from going beyond the near and far limits of the objective position (see
2FARLMT and 2NEARLMT).
The 1LOG IN line lets you affect the state of all
commands beginning with 1; the 2LOG IN line does the same
for command beginning with 2. This is actually fairly reasonable. All
commands to control lamps, condensors, objectives, and shutters begin
with 1; z-axis motion of the objective and autofocusing begin with
2.
Using the buttons on the chassis
The Olympus IX-81 has a number of buttons for focusing up and down, controlling the lamp, switching between coarse and fine focus, and often a keypad with a number of buttons. When you have sent the login commands, none of these function as they did. You have to handle their events yourself.
First, send
1SW ONwhich will make the IX-81 send a string everytime one of the buttons
is pressed or released. It uses the same string for any button release,
so you cannot work with any combinations of buttons, only one at a time.
When any button is released, the IX-81 sends 1SW 0.
When a button is pressed it sends 1SW
where
is an integer indicating the button. The buttons are (written in
scientific notation – for actual use, write them out with no commas, so
1e4 will appear as 10000)
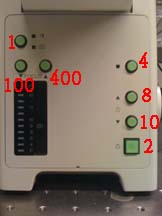
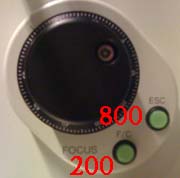

If you do not have precisely the keypad shown above, this is no great
problem. Simply run HyperTerminal or Termite, log in and turn on
1SW ON, then start hitting the buttons and write down the
numbers which are sent to the terminal.
To disable the button commands, send 1SW OFF.
Objectives, condensors, etc.
This section is organized along the lightpath, beginning at the lamp.
Only lightsources such as the transmitted light lamp which are mounted
directly on the chassis are controlled by this command set. Most mercury
or xenon lamps for fluorescence microscopy are external. If you do have
a second internal light source, the command to change between light
sources is 1LMPSEL. To select the transmitted light source,
issue
1LMPSEL DIAI have no other light sources on my chassis, and so no idea what the relevant commands might be.
You can turn lamps on and off with
1LMPSW ON
1LMPSW OFF
Its intensity is controlled by the supplied voltage. For the transmitted light lamp the voltage ranges from 0V to 12V. The chassis accepts voltages given in tenths of volts, so setting the intensity to 0V, to 5.6V, and to 12V, would be
1LMP 0
1LMP 56
1LMP 12
The chassis’s control panel has two shutter ports, labelled SHA1 and SHA2. Generally SHA1 is connected to the transmitted light shutter, and SHA2 to the fluorescence shutter. If you have additional light sources and shutters, they will be controlled directly, not through the chassis. To open and close shutter 1, then shutter 2, issue
1SHUT1 OUT
1SHUT1 IN
1SHUT2 OUT
1SHUT2 IN
Mnemonically, a shutter is closed if it has put something in the
light path, and open if it has taken it out. There is a third command to
control the external shutter for a fluorescent light source:
1LED. It accepts one argument, either 1 or 2. Which one
opens or closes the shutter depends on whether your particular external
shutter is open or closed when it receives a low voltage on its control
wire (2 is low voltage; 1 is high voltage).
If you have a motorized condensor, 1CD # selected item
# in the condensor wheel.
The positions on your objective nosepiece are numbered 1, 2, etc. To switch to the objective in position 3, issue
1OB 3Beyond the objective is your filter cube. Again, the positions in the wheel containing these cubes are labelled 1, 2, etc. To select the filter in position 2, issue
1MU 2Beyond the filter cube is the prism which directs the light either to
the camera port or to the eyepiece. 1PRISM 1 shifts to the
eyepiece, 1PRISM 2 to the camera. If you have a lower back
port for an additional camera, 1BPORT controls this, but I
don’t have one and can’t test it. For safety reasons, you should always
close the external fluorescence shutter with 1LED when you
use 1PRISM to switch to the eyepiece.
Motion
The only motion controlled by the chassis is the z-position of the objective. Before you start moving it, you should set the near and far limits, such as with
2FARLMT 10
2NEARLMT 3000000
To get the current position, use 2POS?. The microscope
returns something like 2POS 539031, where 539,031 is the
current z-position in hundredths of a micron from its farthest
position.
To actually move the objective, use 2MOV.
2MOV F,2500,1,300000,49
2MOV N,300,1,300000,49
2MOV d,539031,1,300000,49
The first argument is one of N, F, and
d, and it changes the meaning of the second argument.
N and F make the second argument a distance to
move relative to the current position, N to move nearer,
F to move farther. With d, the second argument
is an absolute position, such as is returned by 2POS?.
The third and fifth arguments set the acceleration at the beginning and deceleration at the end of the z motion, though I have not yet figured out in what units. The fourth argument is the speed at which to move in units of a tenth of a micron per second (this is inconsistent with the distance measurements in the chassis!).
2POS? and 2MOV are inconsistent with the
rest of the commands: the chassis responds to 2POS and
2MOV? as errors. If you issue 2MOV when the
chassis is already executing another 2MOV command it
returns 2MOV !,E02110. To stop a motion in progress, send
2STOP. It will return 2STOP +, and the
currently executing motion will return an error with
2MOV !,E02133.
Autofocus
I only deal with the ZDC hardware autofocus system. Software autofocus is entirely independent of the microscope, and is inevitably a bad hack to work around the absence of a hardware autofocus. All motorized microscopes should have a hardware autofocus. Unfortunately, most microscope software persists in treating it like software autofocus.
ZDC works by firing a laser through the objective at the sample. The laser reflects off the near side of the coverslip (its interface with air) for air immersion and low magnification objectives, or off the far side of the coverslip where it meets the sample in oil and water immersion and high magnification objectives. One side effect of this is that the microscope knows which way it needs to move to go towards focus. This is distinctly different from software autofocus.
ZDC commands begin with 2AF. To set the near and far
limits of the range in which the ZDC can search, use
2AFFLMT 536531
2AFNLMT 541531
You can give yourself plenty of space. Unlike software autofocus,
hardware autofocus is slowed only by how far it is from correct focus,
not by how large a search range you allow it. You also have to set the
2NEARLMT and 2FARLMT commands or the ZDC will
fail with 2AF !,E02311.
At least before the first time using the ZDC in a session (though you can do so as often as you want), issue the magic command
2aftim 4I couldn’t find any conditions on my microscope which changed this, which makes it impossible to reverse engineer. Then you have to set up your objective with
2AFTBL nnwhere nn is a number corresponding to your objective
(see the table in the appendix for the command 2AFTBL for
its values). Finally, to actually move the objective where it is focused
on the edge of the coverslip, use
2AF SHOTIf it succeeds, it will reply 2AF +. If it fails, it
returns an error code:
2AF !,E02312= the coverslip’s boundary is outside the far range limit2AF !,E02313= the coverslip’s boundary is outside the near range limit2AF !,E02331= the ZDC could not find a coverslip boundary
The first two mean you are probably using too small a search range. If you get the third, or you get one of the first two and you know your search range is adequate, then make sure you have adequate oil with no bubbles on your objective, and that your sample is sufficiently rigid and heavy not to be shifted by the microscope. For example, ZDC usually fails if you are using only coverslips for your sample. If you mount your sample between a coverslip and a heavy glass slide instead of two coverslips, this often fixed the problem. Similarly, a colleague found that if she made her microfluidic devices much thicker (and so much heavier), the ZDC magically started working consistently.
Unknown
1SNDOB
1SW
2AFSTS
Appendix: Command Reference
1BPORT
Switches to the back port of the chassis, if it has one. Not tested.
1CD
Usage: 1CD pos
Switch to position
pos of the motorized condensor.
1LED
Usage: 1LED (1|0)
Open or close the external
shutter for the fluorescent light source. Whether 1 corresponds to open
or closed depends on your shutter. 1 corresponds to high voltage on the
control line.
1LMP
Usage: 1LMP inten
Set the intensity of the
transmitted light source to inten, measured in tenths of a
voltage between 0V (1LMP 0) and 12V
(1LMP 120).
1LMPSEL
Usage: 1LMPSEL lamp
Select illumination
source lamp. Almost always lamp will be
DIA.
1LMPSW
Usage: 1LMPSW (ON|OFF) Turn the currently selected lamp
(usually the transmitted light source) on and off.
1LOG
Usage: 1LOG (IN|OUT)IN means place
all commands beginning with 1 under computer control, locking out the
microscope chassis’s physical controls unless specifically reenabled.
OUT means to return control to the chassis’s physical
controls, and prevent the computer from making changes to the
microscope’s state. Mnemonic: “log in”
1MU
Usage: 1MU pos
Sets the filter wheel to
position pos.
1OB
Usage: 1OB pos
Sets the objective
nosepiece to position pos.
1PRISM
Usage: 1PRISM (1|2)
1 diverts the light path to the
ocular. 2 diverts it to the camera. You should probably close the
external fluorescence shutter with 1LED when you have
diverted light to the ocular.
1SHUT1
Usage: 1SHUT1 (IN|OUT)
Opens (OUT) and
closes (IN) shutter 1 (connected to port SHA1 on the
chassis – usually transmitted light).
1SHUT2
Usage: 1SHUT2 (IN|OUT) Opens (OUT) and
closes (IN) shutter 2 (connected to port SHA2 on the
chassis – usually transmitted light).
1SNDOB
Unknown.
1SW
Usage: 1SW (ON|OFF) Turns on/off using the buttons on
the microscope chassis. When on, all button releases result in
1SW 0 being sent to the computer. Button presses result in
1SW
,
where
is an integer indicating the button.
1UNIT
Usage: 1UNIT?
Returns a string describing the
microscope. Our scope returns
1UNIT IX2,FRM,RV1,FO,MU6,HS.
1peekb
Usage: 1peekb reg
Looks at the value in
register reg. CellR sends 1peekb D0003 during
startup and receives the response 1peekb C7.
2AF
Usage: 2AF SHOT
Autofocus with the ZDC. For air
immersion, low magnification objectives, it leaves the objective’s focal
plane at the air/coverslip interface nearest the objective. For water or
oil immersion objectives, it leaves the focal plane at the interface
farthest from the objective. If it succeeds in doing so, it returns
2AF +. If it fails, it returns one of the three following
errors:
2AF !,E02312= the coverslip’s boundary is outside the far range limit2AF !,E02313= the coverslip’s boundary is outside the near range limit2AF !,E02331= the ZDC could not find a coverslip boundary2AF !,E02311= you haven’t set2NEARLMTand2FARLMT
Errors 2312 (outside the far range limit) and 2313 (outside the near
range limit) can be fixed by extending the range with
2AFFLMT and 2AFNLMT. 2331 (could not find
boundary) usually results from one of three things: your oil on the
objective is inadequate or foil of bubbles; your sample beyond the
coverslip is dried out; or your assembly around your sample isn’t heavy
enough, such as if you put your sample between two 24x60mm coverslips
instead of a coverslip and a heavy glass slide.
Before you execute 2AF SHOT, you need to send the
commands 2AFFLMT, 2AFNLMT,
2AFTBL, and 2aftim.
2AFFLMT
Usage: 2AFFLMT pos
Set the far limit of
the range of z-positions in which the ZDC can search for the coverslip
position to pos, measured in hundredths of a micron, and from
the same origin as the positions returns by 2POS?.
2AFNLMT
Usage: 2AFNLMT pos
Set the near limit of
the range of z-positions in which the ZDC can search for the coverslip
position to pos, measured in hundredths of a micron, and from
the same origin as the positions returns by 2POS?.
2AFSTS
Unknown.
2AFTBL
Usage: 2AFTBL num
This configures the ZDC
to use a particular objective. It must be done before using
2AF SHOT. The numbers for the different objectives are
| num | Objective Type |
|---|---|
| 75 | LCPlanFl 20x |
| 76 | LCPlanFl 40x |
| 79 | LCPlanFl 60x |
| 78 | LUCPlanFl 40x |
| 75 | LUCPlanFlN 20x |
| 76 | LUCPlanFlN 40x |
| 79 | LUCPlanFlN 60x |
| 31 | PlanApo 100x O3 |
| 70 | PlanApo 60x O TIRFM-SP |
| 62 | PlanApo 60x O/LSM |
| 30 | PlanApo 60x O3 |
| 60 | PlanApo 40x W/LSM |
| 30 | PlanApoN 60x O |
| 77 | SLCPlanFl 40x |
| 45 | UApo 30x 3/340 |
| 47 | UApo 40x 3/340 |
| 48 | UApo 40x W |
| 57 | UPlanFl 60x OI3 |
| 36 | UPlanAPO 20x |
| 43 | UPlanApo 100x OI3 |
| 39 | UPlanApo 40x OI3 |
| 40 | UPlanApo 60x |
| 41 | UPlanApo 60x W |
| 42 | UPlanApo 60x W/IR |
| 58 | UPlanFl 100x O3 |
| 55 | UPlanFl 20x |
| 71 | UPlanFl 40x O-SP |
| 56 | UPlanFl 40x |
| 58 | UPlanFlN 100x O |
| 58 | UPlanFlN 100x OI |
| 55 | UPlanFlN 20x |
| 39 | UPlanFlN 40x O |
| 40 | UPlanFlN 60x |
| 57 | UPlanFlN 60x OI |
| 43 | UPlanSApo 100X O |
| 36 | UPlanSApo 20x |
| 47 | UPlanSApo 40x |
| 30 | UPlanSApo 60x O |
| 41 | UPlanSApo 60x W |
| 56 | UPlanFlN 40x |
2aftim
Usage: 2aftim n
This is a magic command which I
don’t understand, but it needs to be sent to the ZDC before using
2AF SHOT. n is 4 as sent by CellM, and can be
any of 1, 2, 3, or 4. Perhaps it’s a timeout command for when the ZDC
fails?
2FARLMT
Usage: 2FARLMT pos
Sets the farthest z
position to which you can move the objective to pos, measured
in hundredths of a micron from the same origin as
2POS?.
2JOG
Usage: 2JOG (ON|OFF) Enables (ON) and
disables (OFF) the focus wheel on the microscope chassis
after you have executed 2LOG IN. See 2JOGSNS
to set the rate at which the wheel moves the objective.
2JOGSNS
Usage: 2JOGSNS sens2JOGSNS
sets the rate at which the focus wheel on the microscope chassis moves
the objective nosepiece in the z direction. sens is an integer,
at least 0 and no more than 10. The speed increasing exponentially with
sens, from about 0.2um per turn of the wheel at sens =
0 to 800um per turn of the wheel at sens = 10.
2joglmt
Usage: 2joglmt (ON|OFF) If the chassis focus wheel is
enabled (with 2JOG), ON prevents you from
going beyond the limits set with 2NEARLMT and
2FARLMT with the focus wheel. OFF removes that
limitation.
2LOG
Usage: 2LOG (IN|OUT)IN means place
all commands beginning with 2 under computer control, locking out the
microscope chassis’s physical controls unless specifically reenabled.
OUT means to return control to the chassis’s physical
controls, and prevent the computer from making changes to the
microscope’s state. Mnemonic: “log in”
2MOV
Usage:
2MOV (N,F,d),x,start,speed,end
Moves the objective’s z-position nearer (N for the first
argument), farther (F for the first argument), or to an
absolute position (d for the first argument). x is
the distance to move or the absolute position to move to. speed
is the speed at which to move in tenths (not hundredths!) of a micron
per second. start and end control how much time at the
beginning and end of the move is spend accelerating. Typically
start is small, say 1, bringing the objective immediately up to
speed, and end is larger, around 50, in hopes of getting better
accuracy in the z motion. The four important error conditions for
2MOV are:
2MOV !,E02414- the motion reached the near limit (as set by2NEARLMT)2MOV !,E02412- the motion reached the far limit (as set by2FARLMT)2MOV !,E02120- the arguments to2MOVare invalid (no motion takes place)2MOV !,E02133-2MOVwas ended by2STOP.
2NEARLMT
Usage: 2NEARLMT pos
Sets the nearest z
position to which you can move the objective to pos, measured
in hundredths of a micron from the same origin as
2POS?.
2POS?
Usage: 2POS?
The microscope responds,
2POS pos, where pos is an absolute z
position of the objective measured in hundredths of a micron.
2STOP
Usage: 2STOP
Stop any currently executing motion.
Always responds with 2STOP +. If there is a
2MOV command in progress, it also aborts and returns an
error condition with 2MOV !,E02133.